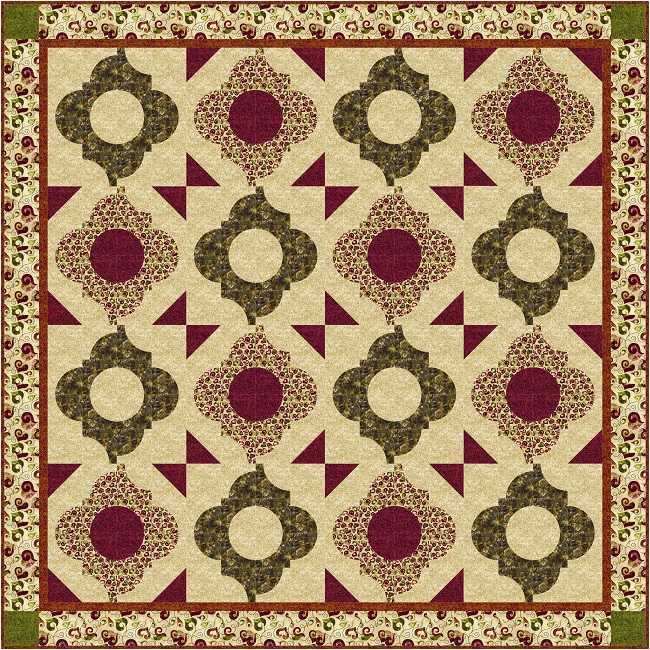
Making Melody by Elisa
Wilson
75" x 75"
Featuring the 4" Drunkards Path
Template by
Elisa's Backporch Design
Fabric is Change of Heart in Red & Tan by
Northcott.com
©2011 Elisa Wilson All Rights Reserved
❖ This pattern features the 4" Drunkards Path Template (optional purchase here).
❖ You will be making drunkards path blocks that measure 4 1/2" unfinished size. 4" finished size.
❖ Paper templates are provided (download here) but it is highly recommended that you purchase the acrylic templates (here) for ease and accuracy in cutting.
❖ Width of fabric (WOF) is based on 40" of usable fabric.
❖ I do not wash my fabric before using. Add extra fabric if you wish to wash before using.
❖ All seams are 1/4".
❖ Press fabrics with a hot iron. Be careful not to distort fabric while pressing. Use a light spay starch if desired.
❖ Curves are sewn using your quarter inch presser foot. Practice with some scrap fabric before beginning.
❖ You can find online sewing tutorials for sewing curves http://blog.backporchdesign.com
|
Read through pattern before beginning.
A little time spent in the beginning will help to make your quilting experience a joyful one.
|
|
Amount
|
Cut
|
|
Red/orange
Inner border & binding
24"
|
Cut 5 strips 1 1/2" wide for inner border
Cut 6 strips 2 1/2" wide for binding
5/8 binding - cut 8 strips 2 1/2" wide
|
|
Light background
116"
|
Cut 96 shape A
Cut 64 shape B
Cut 32 squares 4 1/2"
Cut 16 squares 5" for HST
|
|
Red
22"
|
Cut 32 shape B
Cut 16 squares 5" for HST
|
|
Medium Green
Corner squares
4 1/2"
|
Cut one strip 4 1/2" wide. Sub cut four 4 1/2" squares for outer border
|
|
Small heart or floral
50"
|
Cut 48 shape A
Cut 48 shape B
|
|
Dark Green
50"
|
Cut 48 template shape A
Cut 48 template shape B
|
|
Large heart print
Outer border
32"
|
Cut 7 strips 4 1/2" wide for outer border
|
|
7 yards
|
Backing
|
Cutting
To cut template shapes A and B cut a strip of fabric slightly wider than the template shape.
Cut a 5" x WOF strip. If using the acrylic templates place up to four layers of fabric and cut around template shape with your rotary cutter. Rotate template and cut another shape. You can get about 14 of shape B and 12 of shape A from a strip of fabric.

Making the Blocks
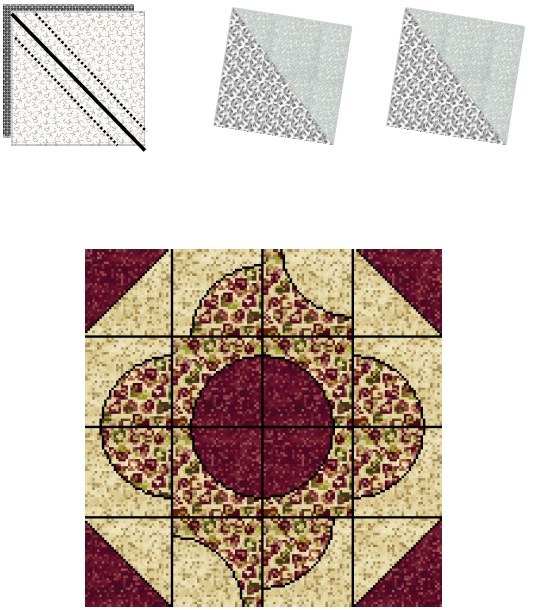
Make 32 Half Square Triangles (HST) using the light and the red 5" squares of fabric. HST will finish at 4" (4 1/2" unfinished size)
a. Draw a diagonal line on the back side of the light fabric.
b. Pair up a light and a red fabric, right sides together.
c. Sew 1/4" on each side of the line.
d. Cut apart on the line.
e. Press open and trim ears.

Block One - make eight
Use the small heart and background fabric shapes along with the HST to make Block One.

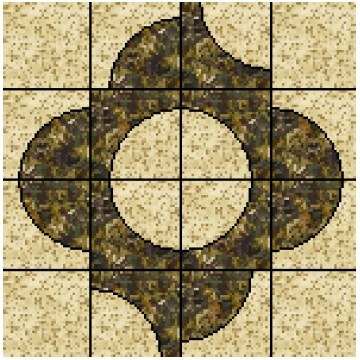
Block Two - make eight
Arrange pieced Drunkards Path blocks using the dark green and light fabric and 4 1/2" squares of light fabric.
Sew the Blocks Together
a. Alternate blocks One and Two as shown on page 1.
b. Sew together into rows.
c. Press the seams of each row in opposite directions.
d. Sew rows together.
e. Press seams.
Inner Border
a.Cut border fabric into 1 1/2" strips.
b.Piece strips together, end to end.
c.Measure the quilt from top to bottom, measure in the center.
d.Cut two strips to this measurement.
e.Sew a strip on each side of the quit.
f. Press seams out away from the top.
g.Measure the quilt from side to side, this time including the two sewn on borders.
h.Cut two strips to this measurement and sew onto the top and bottom of the quilt.
i. Press seams out.
Outer Border
a. Measure the quilt top.
b. Piece together four strips using the outer border fabric to this length.
c. Sew a strip to each side of the quilt.
d. Sew a 4 1/2" medium green square to each end of the remaining two strips.
e. Sew these two strips to the top and bottom of the quilt top.
Binding
- After quilting your top you will need to bind it by doing the following; sew the binding strips right sides together, end to end, to make one long, continuous strip. Press the strip in half, wrong sides together lengthwise. Roll into a loose ball to make handling easier.
- Sew to the front of the quilt, mitering at the corners. Press over and turn to the back. Sew to the back by hand or machine.
- Make a label for your quilted treasure and enjoy.
www.backporchdesign.com

Download and Print Instructions