X
GO

How to sew Perfect Hourglass Blocks with Inklingo

Summary

Ever get frustrated sewing hourglass blocks? Read about a fascinating way to sew them perfectly every single time using your printer as a guide. Read about it now!

Rating: 8 Ratings
Your rating: Sign in to rate

How to sew Perfect Hourglass Blocks with Inklingo

Have you ever been frustrated with sewing hourglass blocks? No matter how hard you try they just do not line up correctly? Well, I would like you to consider an option using your inkjet printer to mark lines to make everything much easier and sew them perfectly!

How to sew Perfect Hourglass Blocks with Inklingo


Monkey and I love sewing Quarter Square Triangles the Inklingo way.

Square of Quarter Square Triangles


It saves time and gives perfect results. How cool is that?

Hourglass blocks are a good way to show you the advantages of printing on fabric with Inklingo.

Quarter Square Triangles


For this example, we are using the Quarter Square Triangles in the FREE Diamond Triangle Square shape collection to make 12 Hourglass blocks by printing only one sheet of fabric.

Quarter Square Triangles


Half Square Triangles (HST) have straight grain on the two short sides. Quarter Square Triangles (QST) have straight grain on the long side.

Quarter Square Triangles


We always prefer to have straight grain on the outside edges of a block, so for Hourglass, we need QST, not HST.


PRINT, SEW, CUT

For 12 Hourglass blocks, we need 48 triangles (4 per block), but only half of them (24) are printed. That means we only test and print on the lighter fabric. The dark fabric is not printed at all! (Although there are Tips for Printing on Dark Fabric)


Quarter Square Triangles


In the "Catalogue of Shapes" in the free shape collection, there are suggested Custom Page Sizes for the QST.

In this case, for 24, we can cut the freezer paper 6.75 x 10 and print a "Custom Page Size" with any ordinary Inkjet printer. (Instructions for printing your first custom size on inklingo.com under "Support & Goodies.")

Next, iron the FP to the right side of the fabric and trim the fabric to the same size with scissors at the ironing board. (Print on Fabric - Best Tips, one of the Top Ten Tutes on the All About Inklingo blog).

Press on the paper side and the fabric side with a HOT dry iron to get a good bond.  (Tips for printing Jam-Free on Quilting Hub)

Quarter Square Triangles

Then  layer the printed fabric right sides together with unprinted fabric and stitch along the diagonal lines. For a "scant" quarter inch seam allowance, stitch immediately beside the lines in the seam allowance, not ON the lines.

When we sew the stretchy bias seams before they are cut, there is no distortion. This is much faster and easier than sewing individual triangles! 

Quarter Square Triangles

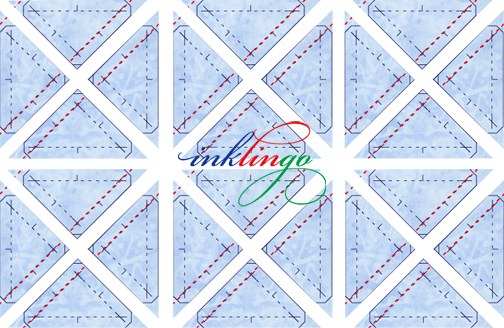
Use a rotary cutter or scissors to cut the triangles apart.

Quarter Square Triangles

Press to the dark . . .


Quarter Square Triangles

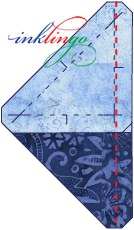
. . . and stitch the last seam!

The seam allowances will nest at the intersection so you can get nice sharp points. I like to release a few stitches so I can press all the seams around the intersection.  It reduces the bulk and makes the quilting easier.

Isn't that easy? A line to sew along, a line to cut on. Perfect results with no waste.  No measuring.  No templates.  No paper to pick off!

MANY SIZES

There are many sizes of QST available.  They are listed in the Inklingo Index of Shapes (under the Support & Goodies tab on the website).

Quarter Square Triangles

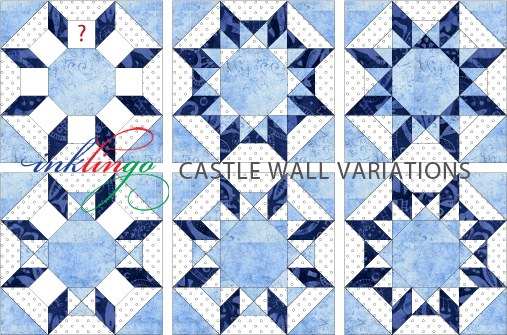
You  can use Hourglass blocks to replace squares in any design. I included QST in the new Castle Wall shape collection for 6 inch blocks, so you can replace the squares with Hourglass blocks.

Quarter Square Triangles

By the way, this same method works for Sawtooth Squares with Half Square Triangles.  This short video shows you how!

There is also a free PDF with Triangle Tips under the Machine Piecing tab at Inklingo.com and several short lessons in the Top Ten Tutes on the All About Inklingo blog.


Check This Out!

Check out the most popular tool on QuiltingHub. Use the search 'Map Of Resources' or the 'Resources Trip Planner' to the right (or below).


Glossary

Bias
The direction of a piece of woven fabric, usually referred to simply as "the bias" or "the cross-grain", is at 45 degrees to its warp and weft threads. Every piece of woven fabric has two biases, perpendicular to each other. Non-woven fabrics such as felt or interfacing do not have a bias.

Same As: Cross-grain
Block
The basic unit of a quilt top, usually square but can be rectangular or other shapes. Blocks can be pieced, appliqued or plain.
Grain
The lengthwise and crosswise threads (warp and weft directions) of a woven fabric.
Ironing
Moving a hot iron while it has contact with fabric. Often ironing can stretch and distort fabrics and seams. A better alternative is to press, where you just lay the hot iron down and lift straight up from the fabric.

See Also: Pressing
Press
Method of using an iron to press seams and blocks. This means simply pressing downwards on the seam with the iron from above and not moving the iron back and forth which can distort the block or seam.
Rotary Cutter
A very sharp tool that looks like a pizza wheel which is capable of cutting through multiple layers of fabric.
Seam Allowance
The width of fabric left to the right of a sewn seam. In quilting this is traditionally 1/4 inch. For sewing garments it is usually 5/8 inch.
Author
Linda Franz

Linda Franz is the inventor of the amazing brand of Inklingo. It has revolutionized piecing and accuracy for the entire industry. Check out her brand page by clicking Inklingo

Is your brand a member? Are you getting the visibility your brand deserves? See member benefits.

Search Articles
Map Of Resources Near
Resources Trip Planner